By: Jeff Kennedy
The return of daylight savings comes with an array of sensory cues that inform us Spring is on the way. My idle mind truly knows not what it wants during the cold, dreary days of Winter, so I long for extended daylight, warmer temps, buds opening, and the familiar trill of Red-winged Blackbirds, kon-ka-reeeee! As the bees resume daily flights, we embark on another season of beekeeping, making our rounds to the apiaries, assessing Winter losses and preparing for early Spring splits.
The coming method outlined allows us to make nucleus colonies from overwintered stock while most beekeepers in my region are still coming out of their Winter slumber. By implementing a version of the double screen bottom board, we are able to begin working the bees in late March once lows stop dipping below 32°F and drones are abundant.
Our colonies are overwintered in ten frame deeps with a medium super on top. This setup permits us to fill the medium with frames of honey in the Fall, providing ample stores during the Winter. The medium also acts as a buffer for the queen to begin laying, come Spring. They are stacked one colony over the other, in customized brood chambers. Our brood chambers feature a deep hive body that is screwed in to a double screen bottom board. The bottom board is the same footprint as the hive body with four (4) evenly spaced, double screen ventilation ports cut out. We run these bottoms all year long as the ventilation ports allow warm air to be exchanged amongst the two colonies during Winter, and assists with thermoregulation in the Summer.
WORKING TOWARDS AN INCREASE
The first step in the Spring is to move the top story colonies to another apiary so that we can begin working the colonies underneath. Some of you are familiar with the term “equalizing” and it is the first step of your Spring management plan. Equalizing is exactly how it sounds, the act of boosting weaker colonies with frames of brood from stronger colonies, making all the hives in the apiary equal. We equalize after we have taken the first round of splits from our colonies. As you will see, these first splits are not as invasive as a full-on hive inspection that would accompany equalization. Our temps are still unstable this time of year, so we try to refrain from busting up the brood nest too much for a few more weeks.
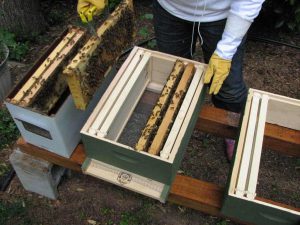
We begin by removing the telescoping cover and flipping it upside down to provide a suitable area to stack the medium super. There is no reason to remove the inner cover as this will likely trigger a defensive response from the colony. We have found that in early Spring, the queen is typically in the medium super and is already laying it up. For the time being, we remove the medium, set it aside, and begin going through the brood chamber underneath.
We bring with us an extra telescoping cover that is also flipped upside down and an empty deep to stack on it. We begin by going through a couple frames inside the brood nest, assessing the colony’s strength and checking the queen’s viability. All of our queens are marked; therefore, we give a quick look for the queen before shaking the adhering bees back into the colony. If located, the queen is caged and set aside while we conduct our manipulations. These quick frame audits usually give us a pretty good idea about the overall strength of the colony. If we encounter a weaker hive, one that is not yet worthy of being split, we close it up and give them another couple of weeks before re-assessing.
We then begin dividing the parent colony with the desired split. We remove a frame of resources (honey/nectar & pollen), a frame of mostly sealed brood, two frames of various stages of egg and larva and give them to the split. While doing this we are also looking for larva that has just emerged, and is suitable for notching. When notching, we take the flat end of our hive tool and push it through the wax, searing the bottom edge of the cells containing the chosen larva. After making contact with the plastic foundation, we push the hive tool down at an angle, crimping the wax underneath. This extra space allows the bees to draw out appropriately sized queen cells in older combs. Because of their rigidity, older combs present problems in frame-based queen rearing as the workers aren’t able to construct suitable sized cells because old wax isn’t as pliable as freshly drawn.
The transferred frames are grouped together and positioned in the middle of the split. We finish the split by filling the rest of the hive body with drawn frames on each side of the brood nest. The parent colony receives the same treatment. With the prolificness of Spring as their guiding light, the bees in the parent colony quickly begin working the empty combs and recover from the split in about a week’s time. When managed throughout the season, this early division of strong, overwintered colonies also reduces swarming in our production hives.
The medium super is placed back on top of the parent colony, the queen is released (if caged), and a queen excluder is placed on top. The split is then placed on top of the queen excluder with the inner and telescoping covers on top. The hive is left alone for the next 24 hours during which time the bees will divide themselves accordingly with whatever number of bees is needed to cover and care for the developing brood within the split.
THE DEVIL IS IN THOSE FINE DETAILS
The next day we return to the apiary with our customized brood chambers. We remove the telescoping and inner covers and then simply transfer the frames over from the split. Once complete, the empty deep is removed and the new colony set in its place with the entrance facing the opposite direction. The double screen bottom inhibits pheromone exchange from the parent colony; therefore, the bees in the split quickly realize that they are without a queen and begin queen rearing procedures. Although being situated in the same apiary can result in some minor drifting, the new entrance is unfamiliar to the bees and cuts down on the number of bees that will return to the queenright colony below.
A week later, we return to the apiary to inspect each of the splits, making sure that they are in the process of rearing a queen. The bees typically use the notched frames that were provided; however, some colonies can also be overly ambitious and draw a dozen or more cells. We cull all but three of the best-looking cells per split, ideally with each cell located on a different frame. These separate cells are beneficial if you encounter a split didn’t begin rearing a queen. When that occurs, you just transfer one of the extra cell frames to the split in need. Once queen rearing is confirmed, the colonies are left alone for three weeks to allow ample time for the queens to develop, emerge, mate, return and commence laying.
Without the abundance of natural predators this time of the year, most nuptial flights are successful. As the season progresses on into the Summer months, rate of return increasingly drops. At the three-week mark, final inspections are performed on the splits. If during this inspection you find a queenless colony, simply transfer another notched frame of appropriately aged larva over to this hive and begin the queen rearing process again.
The splits that have a mated queen are now officially a colony and are transported to a different apiary to build up over the next several weeks of prime weather and bloom. If the weather cooperates, our early Spring split procedure takes about six weeks from the time of split until customer pick-up. This period allows ample time for all of the biological processes mentioned as well as an additional two to three weeks of laying time for the queen.


