
Click Here if you listened. We’d love to know what you think. There is even a spot for feedback! Read along below!
New(ish) Beekeeper Column
Frame Manipulations
By: Richard Wahl


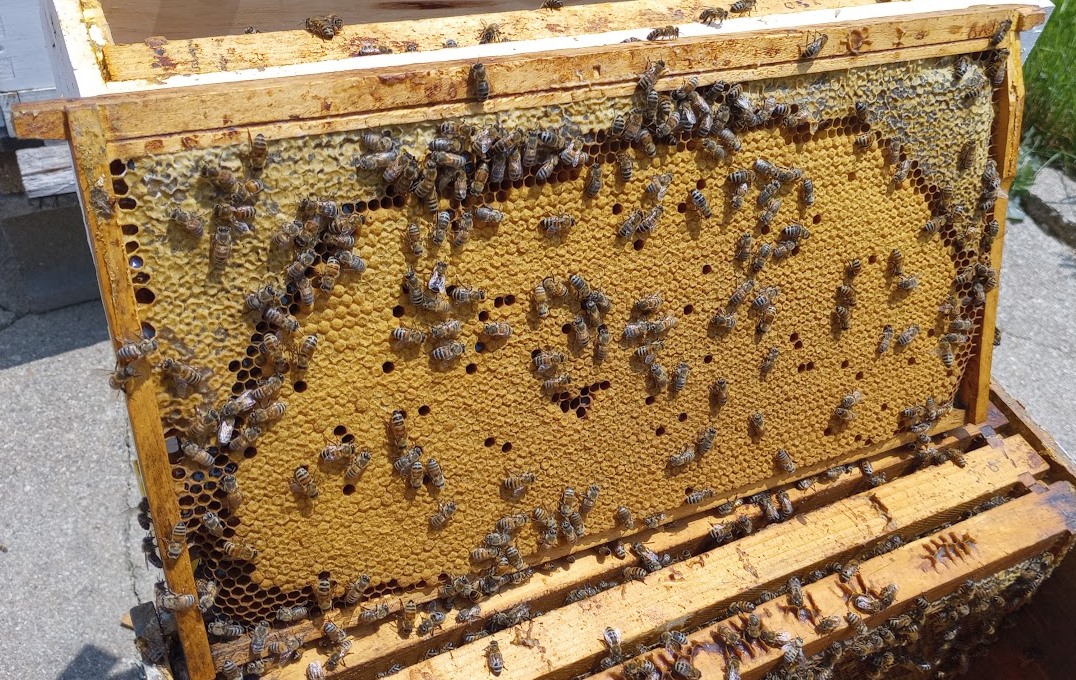
honey comb cells drawn out farther than first year use

From Supers to Frames
In last month’s article I wrote about reversing brood supers, when to add honey supers, feeding options and some generalized inspection suggestions. In this month’s article I will dive deeper into the manipulation of individual frames within those supers. A super is of course, just another name for the box that contains the brood frames or the honey storage frames. Understanding the pros and cons of appropriate frame manipulation can enhance or be detrimental to maintaining a strong and productive bee colony. It is another one of those beekeeping skills that results in bees that thrive while producing a larger honey crop. As with all things in beekeeping there are numerous ways to approach this task and I will present some methods that I have found to be advantageous.
Nectar Flow Frame Manipulation
As the bees begin to collect nectar in the first Spring nectar flow, they will usually build comb near the center frames before working those frames closer the sides of a super. Bees appear to prefer to work the middle frames first. By the time of the first thorough frame inspection (that should occur about the time the dandelions are in full bloom) there may already be several frames covered in eggs, larva and capped brood in the center of a lower deep or medium super. As the central frames are filled out they can contain a small area of pollen and an area of nectar or capped honey on the upper outer edges of the brood frames. These brood frames should be kept together as long as temperatures continue to drop below the 50°F (10°C) degree range at night. On those occasional nights when temperatures fall below 50°F (10°C) the bees need to cluster around the eggs and brood to keep them warm. The temperature around eggs and brood has been found to be in the 90-95°F (32-35°C) range in order for those eggs and brood to survive. Any capped honey frames left over from the previous Winter can be moved to the outer most sides of the super while a frame containing pollen should be left nearer the brood frames. If night temperatures will get colder pollen/nectar/honey filled frames left next to brood frames serve as an additional source of insulation around the bee cluster. Otherwise intermediate frames can be fresh foundation frames or unused drawn comb frames to fill in between the central brood and outer most honey/nectar frames. As the bees fill in the central most frames they will move up into the super above, if present, before filling out frames closer to the sides of the super. That is why it is recommended to wait until all but one or two frames are being used before adding another super. The beekeeper could use a queen excluder. But he/she must be vigilant about usable space for the queen to lay eggs since if the bees begin to feel overcrowded without adequate room this may be an inducement to swarm. A strong overwintered queen can lay from as many as 1,500 to 2,000 eggs in a day. Since one side of a standard deep frame contains approximately 3,200 cells this means the majority of both sides of a drawn comb frame could be filled in two to three days.
Once the nighttime temperatures tend to remain above the 50°F (10°C) range new frames can be added between brood frames in what is known as a checkerboard pattern. This is where capped brood frames are alternated with drawn comb or new foundation frames. The queen will be encouraged to lay eggs in the drawn comb frames or the bees will be encouraged to draw out new comb on the undrawn foundation. This works best when there is a good nectar flow on. I have seen queens begin to lay eggs in comb that has only been halfway drawn out. During the three days in the egg state and the following six days as a larva the bees continue to draw out the cell to be ready for capping around the ninth day after the egg was laid. This is an opportune time to remove any older excess pollen frames or older capped honey frames as long as some pollen and nectar/honey are left nearby as a food source for bees to care for the larva and emerging brood.
It is a good idea to remove a few of the oldest, darkest frames provided they do not contain eggs or brood. As the frames are reused time after time their size decreases by 3-4% each year. This is due to the very thin cocoon the pupa spins around itself while in the capped stage while the lipid wax takes on a darker color and absorbs any waste the larva and the pupa have excreted. All living organisms excrete waste and the lipid wax absorbing that waste is what results in comb darkening, getting minutely smaller and getting much harder. After four to five years the cell is reduced in size by as much as 15-20%. This means the resultant bee raised in that cell is 15-20% smaller with a corresponding 15-20% less body fat and energy to collect all that water, resin, pollen and nectar when they reach the foraging state, thus decreasing the productivity of the hive. Additionally the lipid wax absorbs minute bits of herbicides and pesticides that bees inadvertently carry into the hive. Removing and replacing old darkened drawn comb frames with new undrawn frames gives the two to three week old bees a purpose to draw new comb, maintains optimal comb size and removes chemical agents absorbed by the wax.
If a hive is expanding rapidly and the beekeeper decides to add a second brood super, a brood frame and a pollen/nectar frame can be moved to the middle of the upper super to encourage the bees to begin drawing out comb and working in that upper super. Fill in the removed bottom deep or medium frames with new frames leaving honey or nectar frames at the outer sides of the bottom super. If previously drawn comb is to be used in the upper super there may not be a need to move frames from the bottom since as stated previously, the bees prefer to move upwards in their comb use.
Frame Manipulation in Nucs
One of the best ways to mitigate the possibility of swarming in a strong overwintered hive is to split the hive into a nuc (nucleus hive). Just as above, if temperatures will fall below the 50°F range at night, the two or three moved brood frames should be kept together in the middle of the nuc. This allows the bees to cluster around those brood frames when night temperatures fall lower as noted above. A pollen and nectar/honey frame should be placed next to the brood frames with any comb-less foundation frames or drawn comb frames placed on the outer edges of the nuc. Since it is the intent of most beekeepers to start a new hive with the nuc, feeding of both one part dissolved sugar in one part water is recommended to get the new hive/nuc off to a good start. Inclusion of a partial pollen or protein patty will also ensure an adequate food supply for the new hive or nuc. This is especially important if there is a dearth occurring at the time of the split or if little external pollen is available for collection by the bees. If natural nectar and pollen resources are available I find the bees will ignore the supplemental food sources that I have provided. The sugar syrup encourages new comb to be drawn while the pollen promotes brood rearing. Although there are some who would promote a community food source some distance away from existing hives or nucs, I find this to be an inducement for robbing, in particular while the nuc is not that strong and the young brood is just beginning to emerge. Another negative aspect of community feeding is that it is only available during the daylight hours when bees leave the hive or nuc. A food source in the nuc or hive is available to the bees for the entire 24 hour day. Provided temperatures do not fall too low, the bees will continue to use and consume internal hive food sources throughout the night. When starting a new nuc it is an excellent time to replace one or two old frames with new ones. Any newly split nuc should be checked after about a week to see that the queen is laying, brood is emerging and the hive is expanding with new comb being drawn out. This is also the most opportune time to capture and mark the queen for easier identification in future inspections of the hive. As that last frame begins to be filled it is time to expand to a full sized hive or to add a second story nuc. The checker boarding of frames can be used in a nuc if night time temperatures will not fall below the 50°F range. This will encourage the bees to draw out the undrawn frame between brood frames a bit faster than if it sits on an outer side of the nuc. If only one side of a frame has eggs and brood that frame can be reversed with the egg/brood side to the outside to encourage use of the empty side of the frame.
Honey Super Frame Manipulation
When it is found that there are only one or two frames that are left to be used in the brood super(s) below it is time to add a honey super or two. If the honey super is of undrawn comb the super needs a full set of eight or ten frames in its first year. After honey has been extracted the frame count can be decreased by one and equally spaced which allows the bees to draw out the honey super frames a bit farther making uncapping easier. I have on occasion checker boarded an undrawn frame between drawn frames with some success as long as those frames were coated with a layer of beeswax. The additional space when using undrawn plasticell based foundation frames with no melted wax brushed on the surface seems to result in a greater chance of the bees making wonky comb crosswise between frames. As per the brood frames bees like to work up. Therefore it is often found that the outer frames in a honey super will not get fully filled out. The beekeeper can alleviate this by moving center filled frames to the outside edge of a super and moving the outer empty frames to the middle. In the event several hives are being worked I have taken a few fully capped frames from one hive and added them to another to result in all the honey frames in a super being ready for extraction. I have also found it to be easier to do several honey super removals and extractions through the summer rather than waiting and doing all extracting at one time later in the Fall.
Fall Frame Manipulations
Preparations for Winter can also serve as a reason to manipulate frames. As the beekeeping season moves into the Fall the bees start to diminish the space for the queen to lay eggs usually in the October time frame. As the bees start using queen egg laying space to store Winter honey supplies, any brood frames in an upper deep or medium can be moved below keeping the food stores over the brood frames below. This is a reversal of the Spring process where brood frames may have been moved to an upper super. If brood frames appear not to have much pollen around the brood area a pollen frame should be left next to the brood frames. One or two nectar/honey frames should be left at the outer sides of the super as they serve to provide additional insulation for the cluster in the middle. Optimally a strong hive going into Winter will have five to seven frames with eggs and brood in the bottom super with remaining frames in a two story hive containing Winter food stores.
Hive Inspection Techniques
When considering any of the aforementioned frame movements, the decisions made are a result of a hive inspection. It is best to conduct those inspections in the late morning or early afternoon when most of the bees will be out foraging. A puff or two of smoke at the hive entrance and then under a lifted side of the inner cover may help to settle the bees. Using a hive tool, gently pry the first or second frame in from the side of a super away from the propolis that bees use to fill in any cracks. The queen is normally not found on one of these outer frames. Slowly lift the frame trying not to crush any bees as they cling to the sides of the frame. Check for the queen once the first frame is removed and then set it on a frame hanger or on a clean surface near the hive. Subsequent frames can be slid to the opened space of the removed frame, lifted and examined a bit more easily. As each frame is examined it can be slid against the previous frame as the inspection continues. Once all frames have been inspected or removed and replaced they should be slid back to their beginning location and the remaining frame or frames reinserted. Unless there is a specific reason to rearrange frames they should be replaced in the same order and orientation from which they were removed. This causes minimal disruption for the bees. It is estimated that a full inspection of all frames sets the bees back one or two days while they return to normal activities. Once a beekeeper becomes comfortable and proficient a full inspection of a hive super should not take more than ten to fifteen minutes. Have a plan for what may need to be done with replacement frames, queen marker, or mite testing equipment nearby so as to minimize the time the hive needs to be open. Minimizing the open time decreases the stress on the bees allowing them to return to normal activity as soon as possible. Once the hive is closed take a few moments to record or jot down a few notes as to what was seen. These notes will serve as immeasurable aids in what needs to occur on subsequent inspections. While brood super frames should be placed tightly together to maintain the correct intervening bee space, honey super frames should be equally spaced to allow bees to draw out comb to the optimal amount as previously stated above. A thorough and efficient inspection can decrease the need or time for future inspections, ensure the colony is as pest and disease free as possible and result in a strong, healthy, productive hive.
