Moving Bees: When You Have To or Want To

By: Jennifer Berry

This article originally appeared in the Spring 2018 issue of BEEKeeping Your First Three Years

There are many reasons we find ourselves “having to” or “wanting to” move bees. The “have-to’s” might occur when a neighbor complains they are bothering the children or the hive is not in the right location. The “want-to’s” might be moving bees to fulfill pollination contracts or to take advantage of different nectar flows. Whatever the reason, moving bees, whether a few feet in the backyard or across several thousand miles, is no easy task. Not only is it hard work (hives are heavy), it’s also a bit intimidating to think about picking up a box with hundreds, no thousands of insects that when disturbed or agitated, will become stinging agents of pain. Since this can be a tricky job, let’s talk about how we can move hives without harming the bees or more importantly, ourselves. But Wait!! Stop the Presses!!!! Placing hives in the right spot, the first time, will save a lot of headaches, backaches and work down the road. So, before we ever move in the first hive of bees, let’s consider the following things.

How suitable is the location (soon-to-be apiary) where you want to place the bees? Below is my check list of “must haves” and “would be nice” for potential apiary sites.

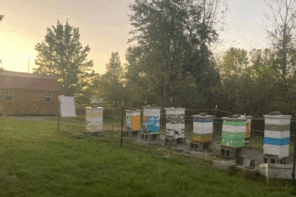
“Must haves”: perennial water source, full sun (or at least eight hours), easy access for a truck and trailer, a cleared, level area free from deadly tripping obstacles, not visible from a road, house, or neighborhood, ability for the entrances to face east to southeast, bees access to floral sources, high spots not prone to flooding, electric fence if in areas that include cattle, horses, pigs or bears.

”Would be nice”: non-agricultural area (i.e. pesticide use), fenced area with a lockable gate or other security measure, not near swimming pools, a mountain view with a sparkling clear waterfall, gentle cool breezes, slippery slide, snow cone machine.

Most of these make sense, but why don’t I want the hives visible from the road or my neighbor’s house? Once people know you have bees, issues may arise. Here’s what I’ve encountered over the years once the bees were detected. Suddenly, everyone in the area was allergic to bees, or when somebody got stung, it was my bees, or some kids decided it would be fun to knock over the hives, or throw rocks or shoot BBs at them. But the worst was when thieves pulled up in the cover of darkness and hauled them away. That is why now, I always keep my hives concealed from the public. If the hives can’t be seen, they will never know they’re there, unless, of course, there is a pool nearby.

Honey bees are extremely attracted to swimming pools. If you have a pool, I would highly recommend you get a cover for it, and keep it covered when not in use, especially in the hot, dry Summer months. Even if other water sources are close by, they may still prefer your pool. If your neighbor has a pool, feed your bees water before it turns hot, to keep them from exploring other options and hence becoming an annoyance. We start getting calls from frustrated pool owners around June and they run until September. It is always the same complaint; we are unable to use the pool because there are hundreds of bees floating or swarming around. Once, in the past, we had to move bees because they became programmed to this gentleman’s salt water pool. We tried everything but nothing worked. Then he started threatening that he was going to set out poison; that’s when we figured it would be best to find another location for our bees. If possible, research the area first to make sure the location will be suitable so you won’t have to move the hives down the road later.

Using foam to close an entrance during the Winter.

However, even the most well thought out apiary site may end up not being suitable. For example, the entrance may not be facing in the right direction, the hive is too close to the swing set, dog house, clothesline or is getting too much shade from that old oak tree or maybe you just don’t like the look of where the hive is located. The arrangement and orientation is breaking up the flow of the landscape or the Feng Shui is now disrupted. That’s why it may help to put out a dummy hive, one with no bees, before the bees arrive and place it in several locations first to see if you like the “look” of where they are.

But for now, and for whatever reason, let’s move some bees. Ok, say you want to move the bees from the front yard to the backyard. No problem, right? We’ll just pick them up and move them. Well, it’s not that easy. Unfortunately, when you move bees in this situation, you must move them at least one to two miles away from the initial location. Then once moved, you must leave them there for several weeks to rewire their brains if you plan to move them back anywhere close to the original location. Why? As bees age and begin to take on foraging tasks, they memorize the location of their hive location by using landmarks (the red barn, big tree, scraggly shrub). As they venture out farther and farther from the hive, they recognize these landmarks in order to make it back home. That’s why it is important to move bees a good distance away since they will fly back to the original location while out and about on their foraging trips. Not only will you lose a considerable foraging force, the homeless bees will continue to swarm around the old home site, causing issues.

Using hardware cloth to close an entrance during the Summer.

But let’s say, you don’t have a place to take them miles away: now what? One method is to just leap frog them through the yard over a few weeks. Each day move them a few feet, and continue this until the hive is resting in its new location. You can accomplish this by placing the hive onto a tarp and slowly over time, sliding it into the new location. This works great as long as the landscape is pretty level. If this isn’t the case, then set up blocks next to and even with the blocks the hive is resting on. Once in place just slide the hive over from one block to the next. Word of caution here, it is always a good idea to strap the hive first before you ever begin to move it. In either example, if the hive is top heavy (or not), it can easily tip over. And a knocked over colony is no fun to deal with.

But, what if the worst-case scenario arises, and you have to move the bees immediately and you still don’t have another location to take them to for several weeks? Here’s what we recommend. If possible, move them during the evening hours, when all the girls are home. If you move them during the light of day, when temperatures are warm enough to allow the bees to fly, a substantial number of foragers will die. Plus, they will not be very happy to find their home has disappeared, and decide to take it out on anything moving in the vicinity: i.e. you. Next, place a dummy hive (a five frame nuc box works great) where the bees were initially located, with one or two frames inside. This will help collect any bees that may have been left behind or can’t seem to find their new home. Then once the sun sets, close the entrance, pick up the box, walk over to the mother hive, open the lid and dump the bees inside. You may have to repeat this process for several weeks, but it will help to collect those girls with good memories.

Hopefully, the above emergency will occur during the colder months, when the bees are unable to forage. If bees are trapped inside, for several days to weeks due to cold weather, it helps to scramble their brains enough so they forget where they used to live. Also, moving bees in the light of day, since cold weather keeps the bees from flying, is far less stressful than stuffing, strapping, loading, traversing roads and fields, unloading, placing, and un-stuffing entrances during the darkness of night. That’s why Winter to early Spring is an excellent time to move bees since daytime temperatures are still relatively cool, keeping the bees home. One more point. Since bees can be knocked out of the cluster while being moved, let’s hope you can wait to relocate them if it is going to be bitterly cold. Chilled bees will be unable to crawl back into the cluster and will die. That is why we try to pick days where night-time temperatures are in the 30s to 40s and day-time temps are in the 50s. We get to the apiary early in the morning, while temperatures are still cold and close the entrances before the bees start flying. Then, by the time they are loaded and we are driving, the temps have warmed up enough so that if they do hit the bottom board, they will be able to crawl back up. February is a perfect month for us here in Georgia, since there are always days that fall into the above temperature ranges. This is another reason why it is really important to choose your apiary wisely so you are not caught in a bad situation.


Ok, now it’s time to get busy moving bees. First off, let’s get the moving gear in order. The following is the list we use. There are many different items you can choose, but this is what has helped us over the years safely move bees: trailer and/or bed of a pickup, smoker, pine straw, lighter, hive tools, moving straps, rope, duct tape, bungee cords, hive lifter, hand truck, material to stuff the entrance, first aid kit, fire extinguisher, water bucket, tool box, nails, flashlights, and charged up cell phones. Hopefully, some of these items will never be used but it is always better to be safe than sorry.

The ole handy hand truck to the rescue.

Now that the gear is loaded, take a deep breath and let’s get busy. The first thing we do, whether cold or hot, light or dark, is smoke the entrances. This will cause the bees to go inside if any are lingering on the front porch. Then we close the entrances, paying close attention to any holes or cracks at the ends, so no bees can escape (this is where duct tape comes in handy). During the Winter months, we use foam that completely closes off the entrance. In the warmer months, we use a screening material or hardware cloth to close the entrance and screen tops for ventilation. Closing colonies during warm months can be risky, so be careful. If the bees can’t cool themselves, they will quickly overheat, and die. That is why you see hundreds of bees hanging out on the front porch when temperatures get hot. Too many bodies inside, too much heat. If moving during warm temperatures (above 70°) make sure to provide plenty of ventilation as mentioned above and please, don’t keep them closed for too long. If you have to traverse long distances in hot weather, you may want to consider using a moving net which several of the bee supply companies carry. It’s just that, a net that covers the entire hive so you don’t have to close the entrance. See, so many options, so little time.

After the entrances are securely closed, we strap the colonies. I prefer using moving straps as opposed to hive staples. I’ve had issues in the past with hive staples coming loose over time, allowing hive bodies to slip apart, and releasing bees. Plus, hive staples leave holes in the wooden ware. However, everyone has a method they prefer. For me, strapping colonies is easy and not too expensive. The main issue here is to make sure the straps are cinched down tight and the loose pieces are tied securely so that they’re not flapping around or getting tangled.

Strapping the colonies into the trailer.

After all the colonies are strapped, it’s time to move them into the bed of the truck or onto a trailer. Two person hive lifters work nice for lighter colonies (Photo #9), or adjusting colonies once loaded but for the larger double-deeped, or triple-supered ones, a hand truck comes in “handy”. Word of caution here; if your bottom boards are screened, you need to make sure the tongue of the hand truck is long enough to clear them, otherwise, you may puncture your screen.

Once colonies are loaded it is very important that they are strapped to the trailer or the truck bed. Insert motto again: “Better to be safe than sorry!” Swerving to miss a critter in the middle of the road or having to stop suddenly to avoid crashing into the vehicle that just pulled out in front of you, can wreak havoc on unsecured hives. Sudden changes in direction or speed can result in hives tipping over and breaking apart, which is not a good thing! Now it’s time to take the girls to their new home. Try not to beat any speed records while pretending to be Mario Andretti, just take your time.

Unloading can be hard on the ole back, but I always breathe a sigh of relief once we and the girls have made – it unscathed, and safely to our destination. Also, unloading colonies, especially heavy ones, can be tricky, so it’s always a good idea to have at least two people while moving bees. Slowly take bees off the trailer or back of the truck, being careful of top heavy colonies that tend to tip over.

Once the colonies are in place, it’s time to put on a veil, remove the straps first and then unplug entrances. Even if it is cold outside, I HIGHLY recommend you wear a veil, at least. I’ve unstrapped and unscreened plenty of colonies over the years, and have learned to be ready to take off running, if need be. Our girls do not like being screened, loaded, unloaded and bounced down roads, therefore, they will come out and let you know how displeased they are, so be prepared; even a puff of smoke can help. Once they are successfully placed, unstrapped, and unscreened, check to make sure they are stable in their new location. After which, it is time to pack up the equipment, jump in the truck and head home for a warm cup of tea (or a cold cocktail, whichever you prefer).

There are thousands of reasons why one “wants to” or “has to” move bees, but hopefully, it won’t be under dire conditions. That is why it’s so important to pay close attention to where you put your bees in the first place, since having to move them may not be very pleasant. And for those of you moving bees for the first time, here’s the final pointer. First and foremost, take your time!!!! Never, never, never get into a hurry while moving bees. Moving bees is not easy and when something goes wrong, it can be bad, really bad, dangerous even. So please, take your time, be prepared and always expect the unexpected. And, bring extra of everything and then some! Or better yet, have someone who’s moved bees before, assist you. Just make sure you have a cold beer and an awesome grilled something waiting for them when it’s all said and done.

Be good to you and your bees!