


By: Roy Hendrickson
This article originally appeared in the Autumn 2016 issue of BEEKeeping Your First Three Years
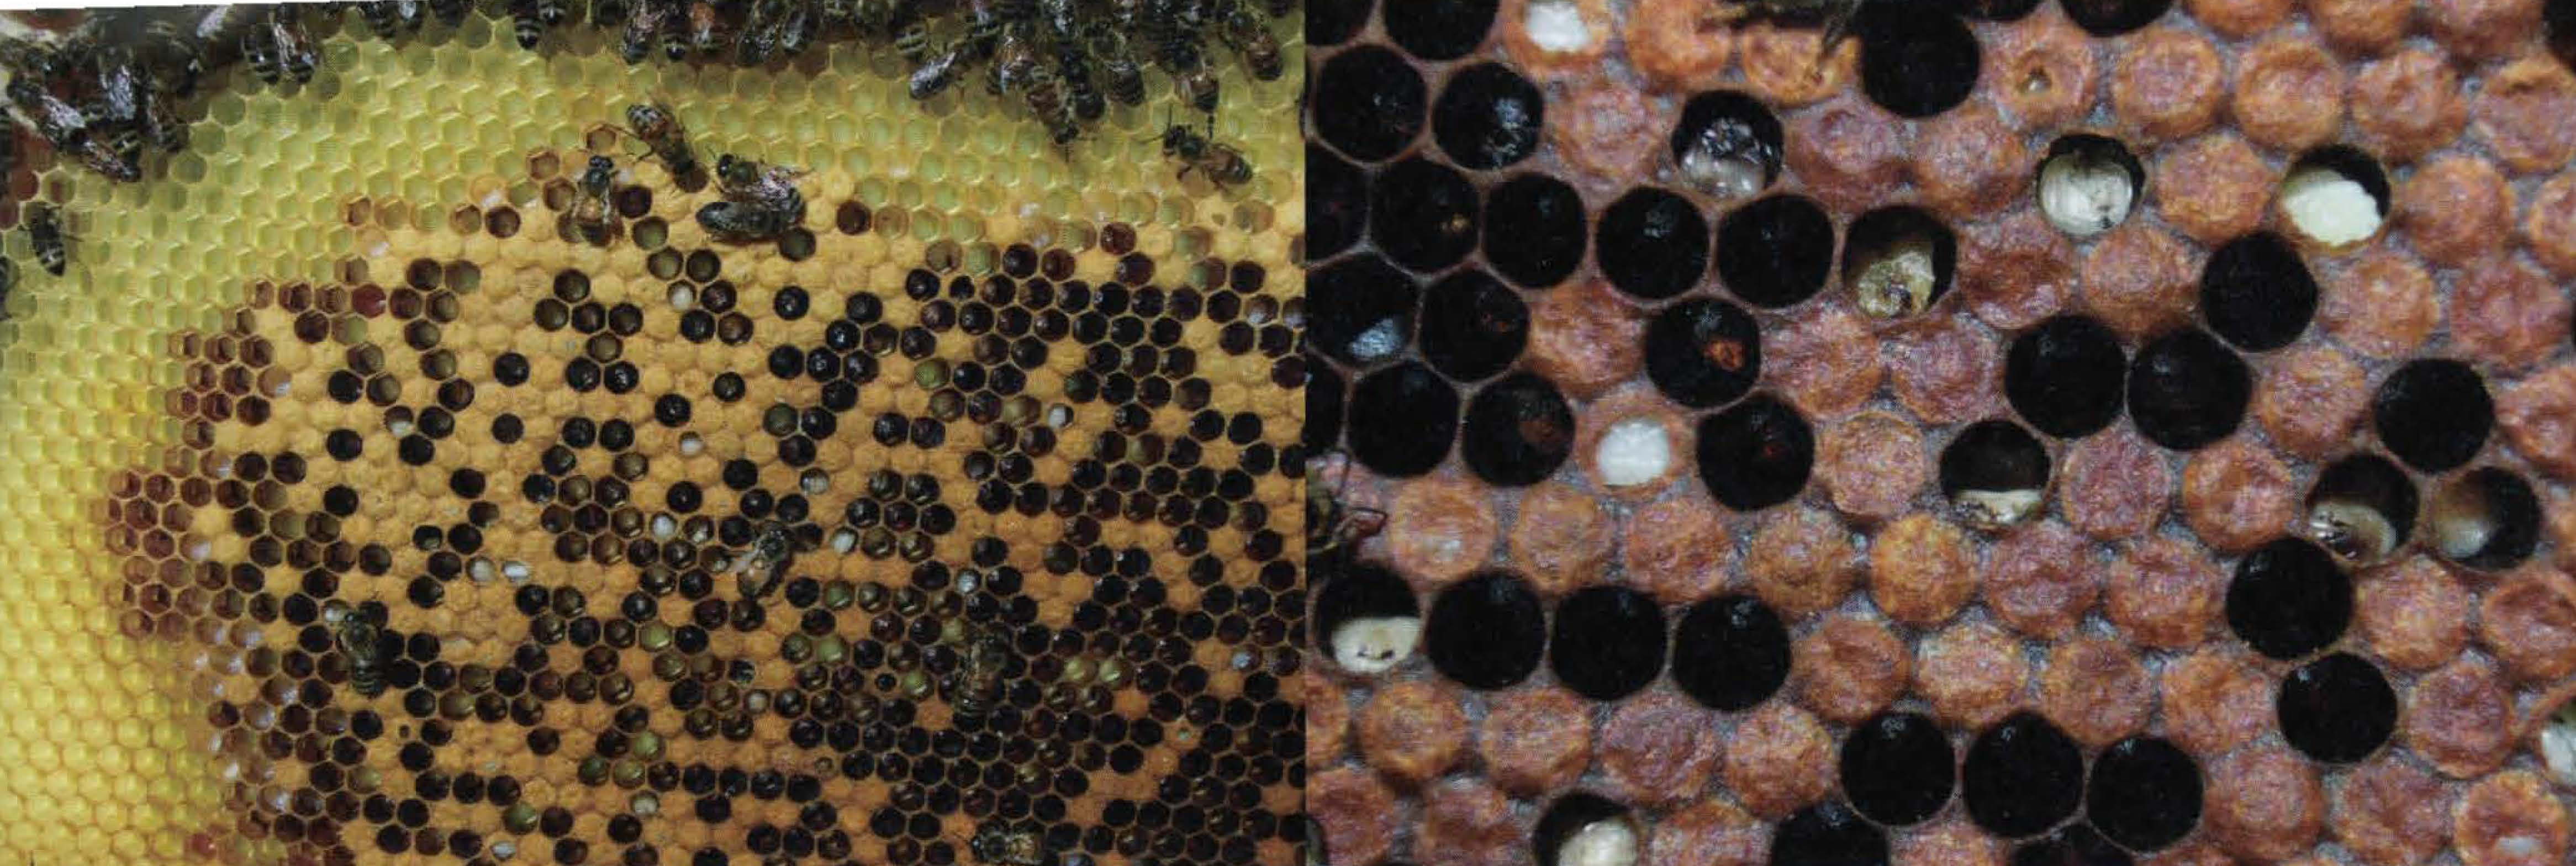 The above photos illustrate the fate that awaits colonies when mite treatment is denied, or where treatment has been applied in an inappropriate or haphazard fashion. Unfortunately many new or aspiring beekeepers are of the opinion, or have been mislead into believing that mite control really isn’t necessary. If left alone bees can take care of themselves, or so they’re lead to believe. Hopefully this article will help illustrate the opposite that mite control is necessary, and when applied properly treatment marks the difference between success and failure.
Mite Buildup
Varroa rears its offspring in the capped brood cells by feeding on the hemolymph or blood of the developing pupae. The foundress, or mother, mite and her mature offspring emerge along with the young bee. (The male mite and any immature females die) Once out of the brood cell they attach themselves to a host bee where they remain until they are able to reenter a suitable brood cell to begin the reproductive cycle anew. It’s easy to understand why maximum mite reproduction coincides with the high rate of brood production found throughout the Spring and early Summer period. While reproductive rates vary depending on the time of year and colony condition, it’s probably conservative to assume that Varroa is capable of doubling its population every thirty days. At that rate a colony that contains 100 mites on the 15th of March will be host to approximately 6400 mites by the middle of September!
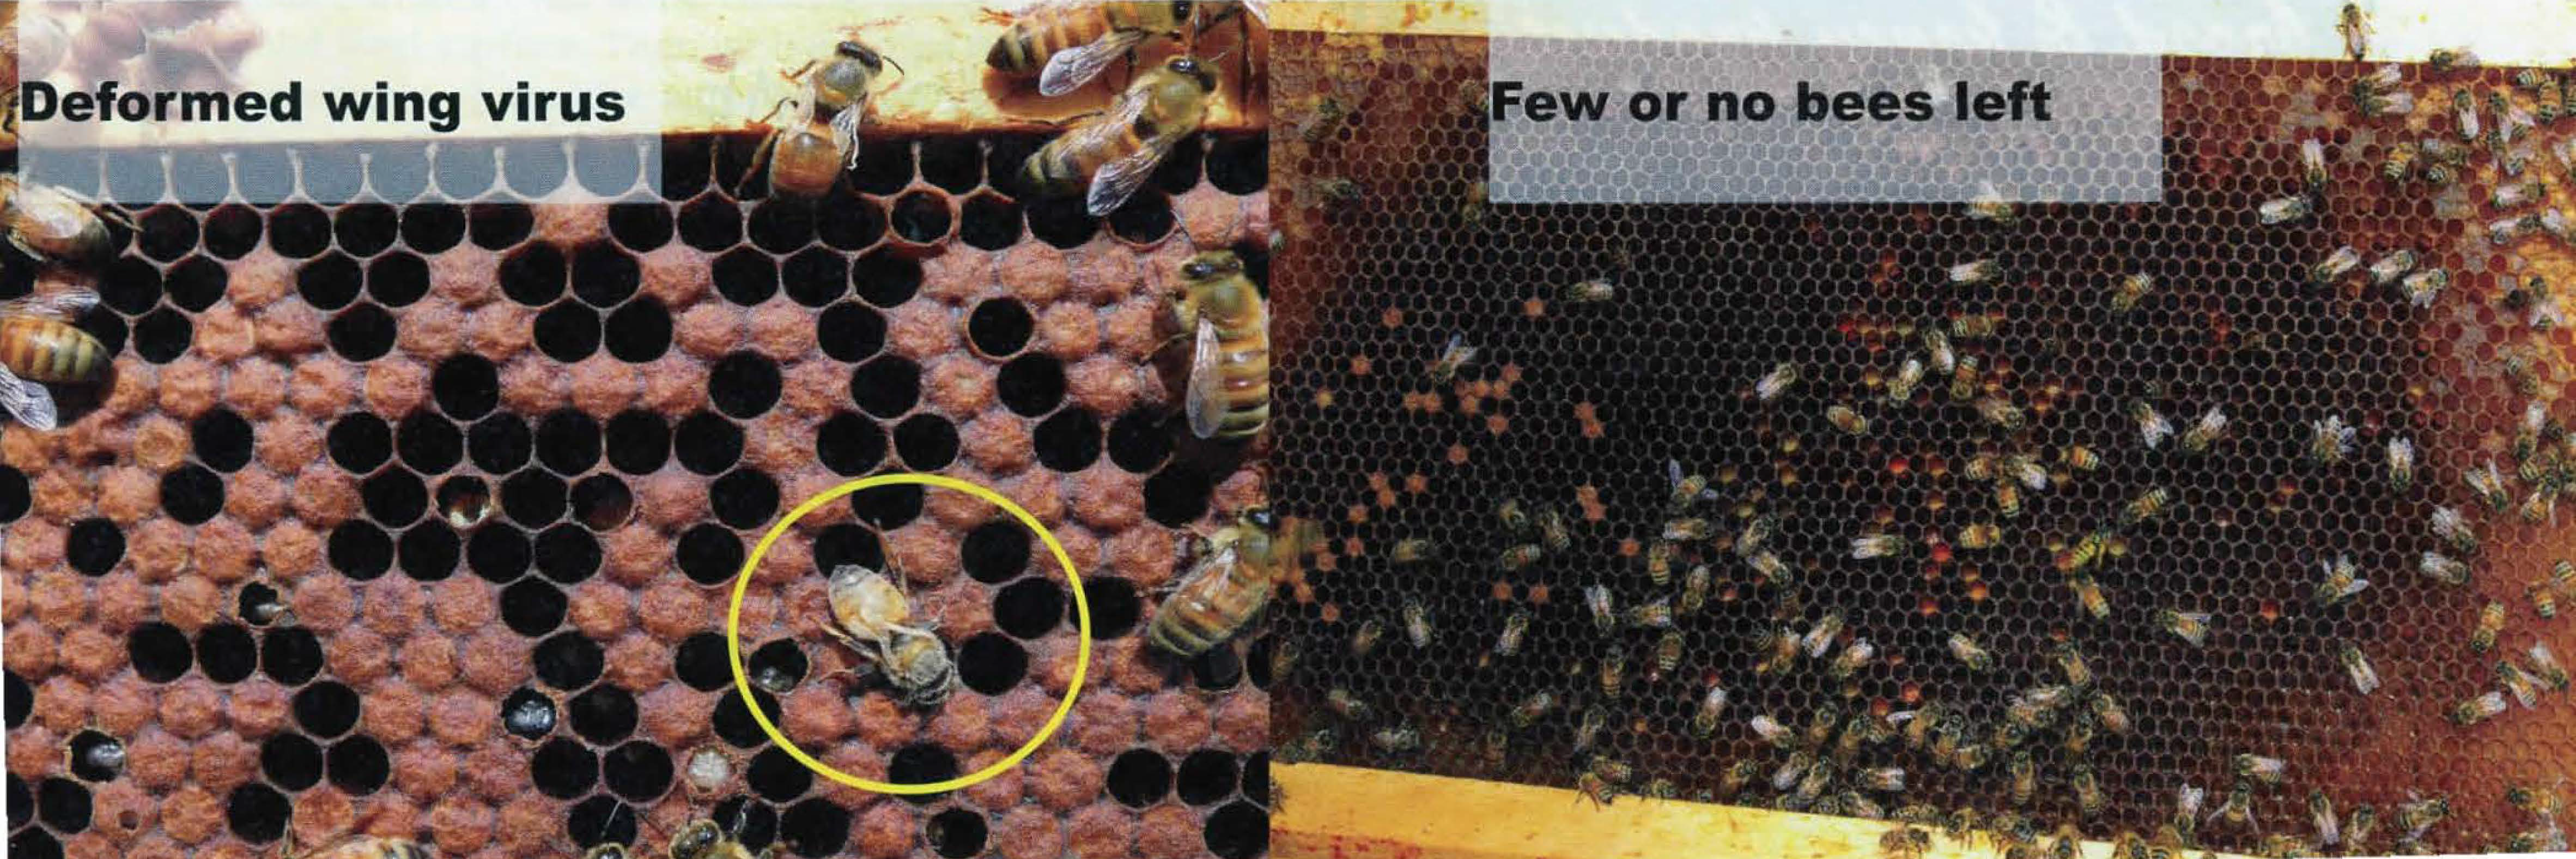 Enter the Viruses. I found my first Varroa mite in the spring of 1990. I knew it was coming, but nonetheless it was a rather stressful event. I remember sitting on the tailgate of my pickup trying to convince myself that it wasn’t the end of the world! Realistically it was the end of the beekeeping world as I then knew it. However, it took several years for that reality to sink in. For the next 10 years or so my primary focus was on preventing Varroa from simply overwhelming my colonies. Gradually the mite-bee relationship began to change. It took fewer and fewer mites to decimate a colony. I started seeing wingless bees, bees with stubby abdomens, and dead or decaying brood with symptoms that mimicked some of the traditional brood diseases. Research explained that by routinely biting and chewing on the pupae and adult bees in order to feed, Varroa was vectoring or transmitting a host of different bee related viruses. There are no medications to control viruses. The only way to control or prevent virus outbreaks is to keep the mite loads low, very low. In other words, you want to prevent the virus outbreaks from ever getting started. This brief, crude summary brings us to the present. Where the road leads from here is anybody’s guess. The only thing I know for sure is that if you ignore Varroa you not only put your own bees at great risk, you are also placing your neighbor’s bees in jeopardy. You are your neighbor’s beekeeper.
Sampling for Varroa
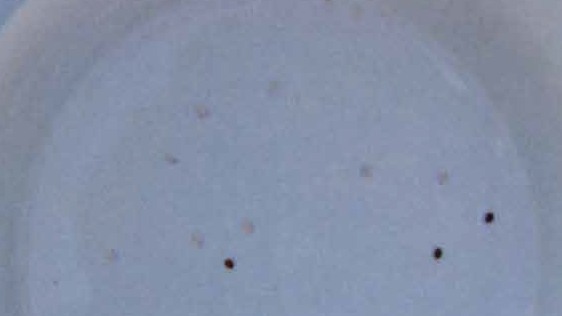
There are a variety of methods that can be used to sample adult bee populations for Varroa mites. However, when you factor in speed, accuracy, and consistency nothing approaches an alcohol wash. Best of all, it immediately allows you to determine whether or not treatment is necessary. Personally I prefer a smaller 150 bee sample over the standard 300 bee version. You destroy fewer bees, use less alcohol, and you recover a larger percentage of mites than with the larger sample.
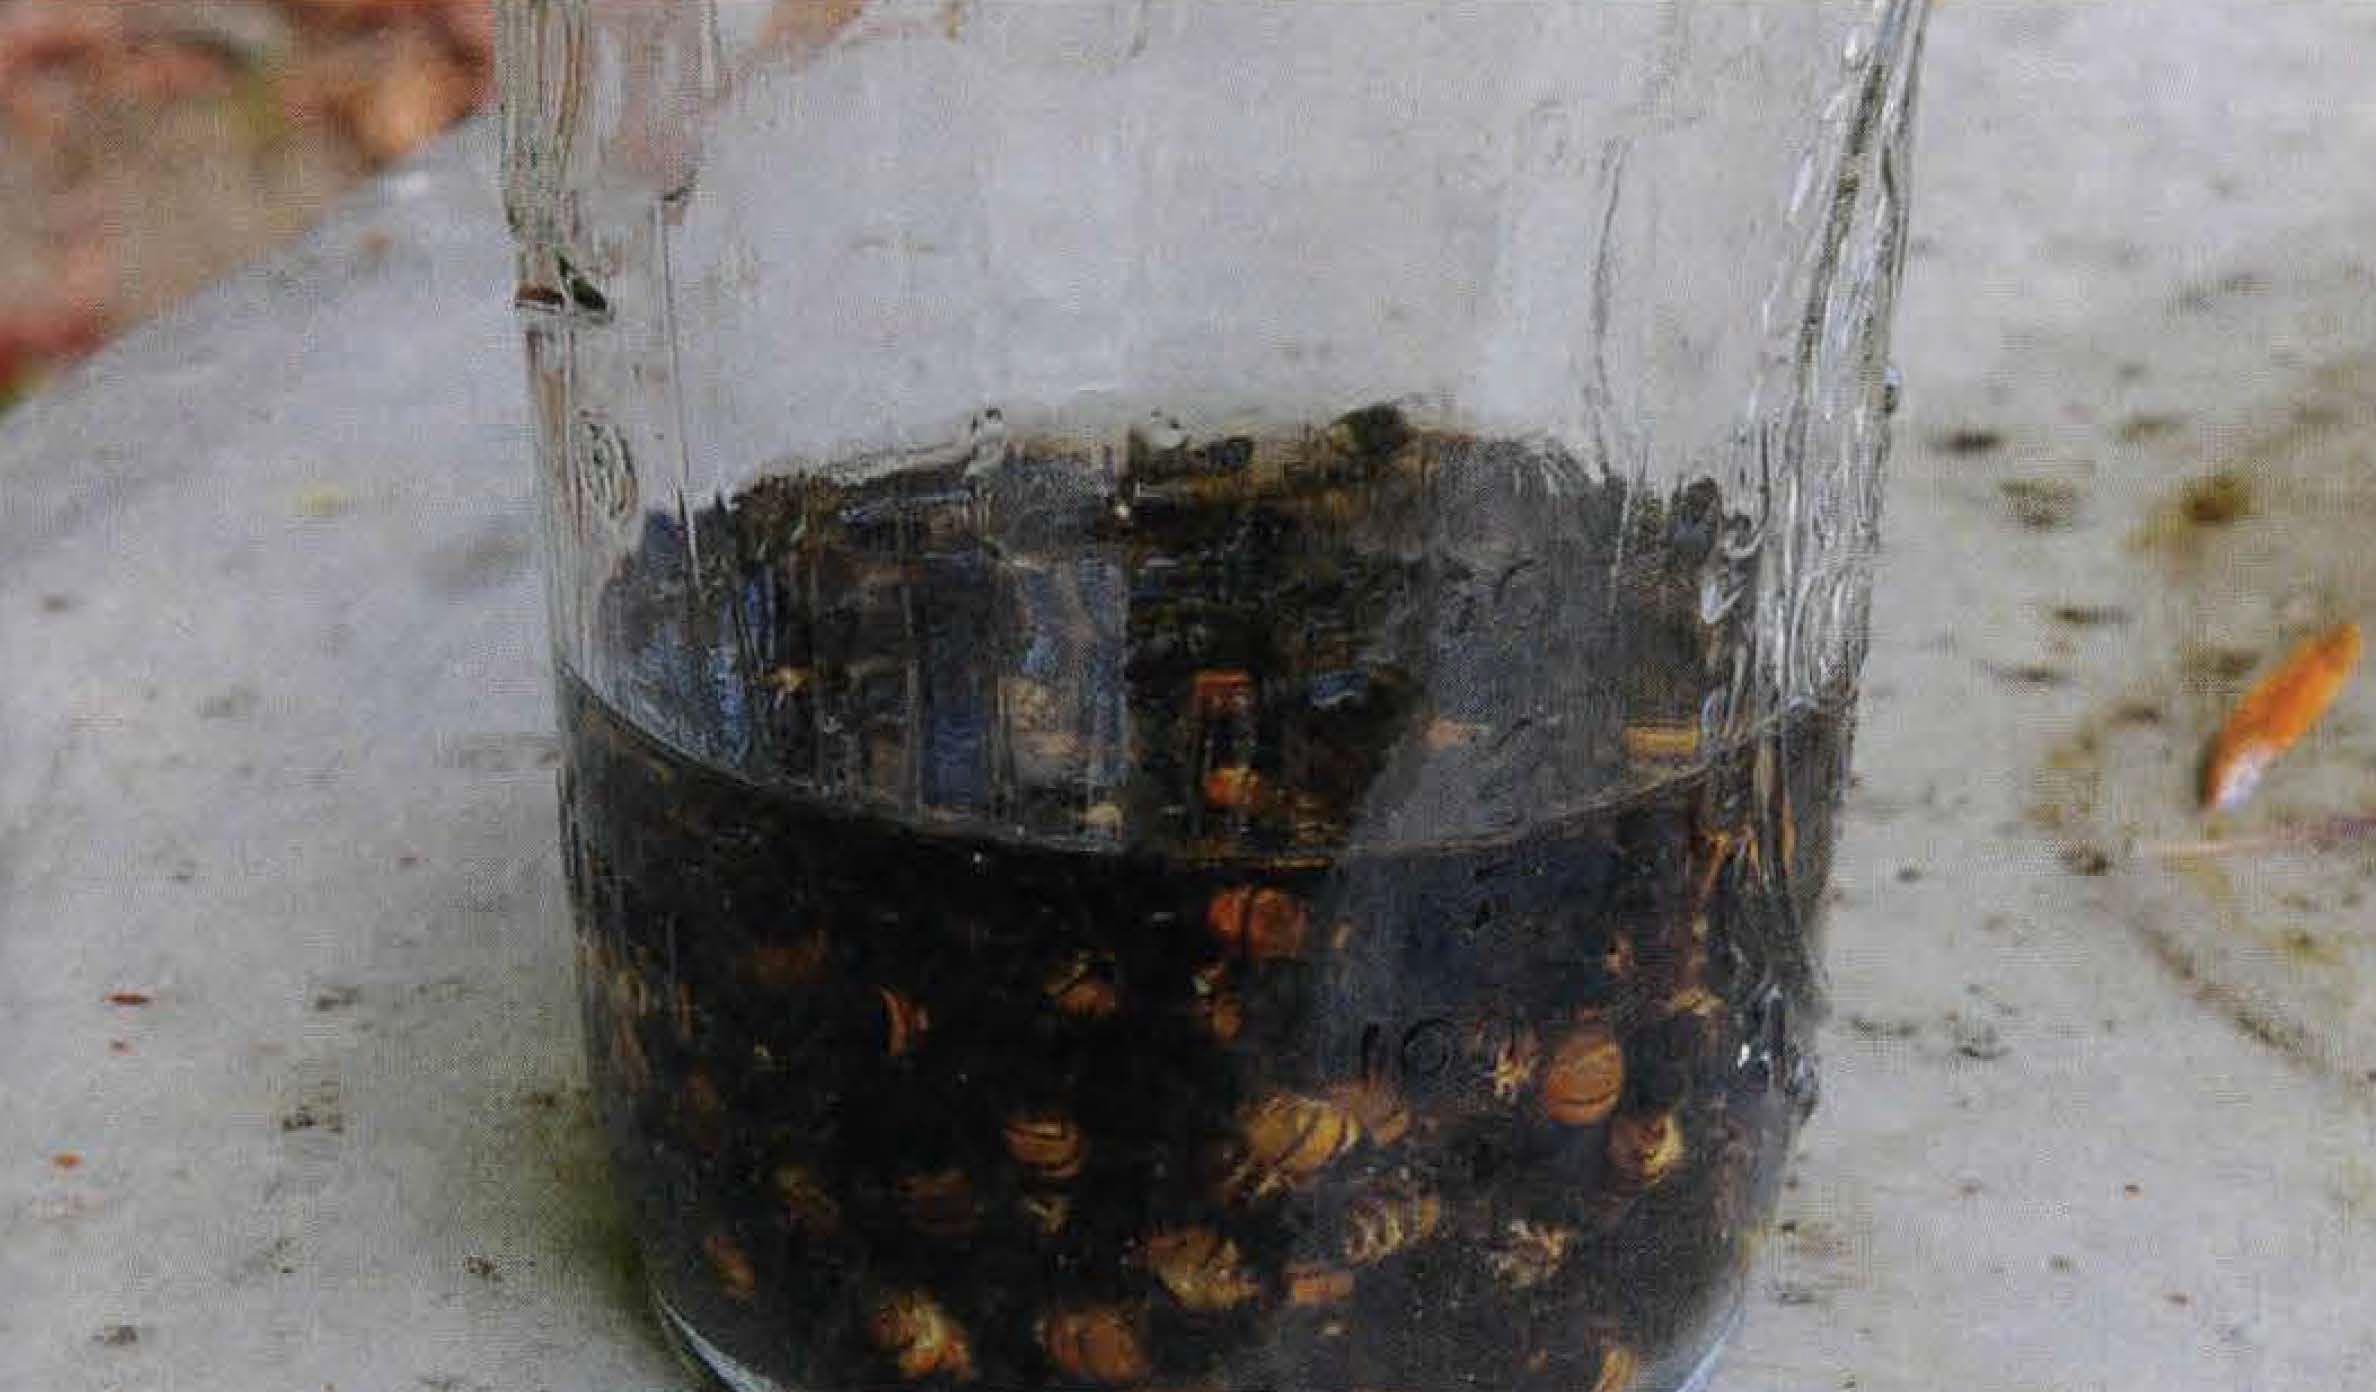
Start by selecting a brood comb that contains some older open brood, brood within 24 hours of being capped. This will provide the highest possible ratio of mites to adult bees. Check carefully to make sure that the queen isn’t on the selected frame. Hold the frame by an end bar and shake a portion of the bees into the collection container. A common 8 by 10 inch Rubbermaid dishwashing tub works exceedingly well. Once the bees have been shaken into the collection container, check again for the queen. Then tap the bees to one comer of the container and scoop up the desired number of bees. (A level ¼ cup equals approx 150 bees, 1/3 cup 200 bees, and ½ cup 300 bees.) I prefer the 150 bee sample size; with the larger samples the additional bees act as a filter to inhibit mite shake-out. Whichever size you choose, dump the bees into a wide mouth pint Mason jar and install the outer ring fitted with an 8 mesh per inch screen. Tap the bees to the bottom of the jar and pour in enough 70% Isopropyl to cover the sample, and then install the solid center cover. Alcohol doesn’t immediately kill Varroa mites, so let the sample to sit for a minute or so before shaking. This will allow the mites time to extricate themselves from under the bee’s abdominal segments. When ready, shake the jar vigorously for 15 to 20 seconds. Now reverse the procedure and remove the center cover and replace the screened lid. For easy visibility I prefer to shake the sample into a Cool Whip container, but any light color container will work. Hold, or place the container on a solid level surface. Then with a single motion, invert and vigorously shake the sample jar up and down five or six times. The idea is to use the alcohol to assist in washing the mites out of the sample jar. Once the shake is complete, count the mites collected in the bottom of the container. Take care to count any mites adhering to the center cover or the inside wall of the jar.
The final step is to compare the total mite count to the predetermined treatment threshold number. From here it should be a simple matter to determine an appropriate treatment regimen based on the local conditions and time of year. I would suggest following Randy Oliver’s recommendation (www.Scientificbeekeeping.com) of not allowing the mite level to rise above 2 mites per hundred bees sampled. Translated, that means the treatment threshold for a 150 bee alcohol wash is 3 mites.
Treatment Options
There are a variety of different mite treatments on the market. They range from the hard or heavy duty synthetics such as Apistan (Fluvalinate), Check Mite (Coumphos), and Apivar (Amatraz) to the softer organic products such as MAQS or Mite Away Quick Strips (formic acid) and Apiguard or Api Life Var (thymol based products). I favor two of the organics, specifically Mite Away Quick Strips and Apiguard. Both of these products are relatively easy to use, and both are effective mite control agents. Best of all, each of these products allows you to easily adjust the dosage based on colony size and the existing mite load.
Mite Away Quick Strips are my preferred form of mite control for full or medium strength colonies. The active ingredient is formic acid which kills by chemically burning the mite. There are two treatment options. The full treatment consists of two strips per colony containing six or more frames of bees. Under normal conditions this treatment should kill between 93 and 95% of the mites, including those mites hidden under the brood cappings. However, under certain conditions two strips can cause varying degrees of brood damage, especially on smaller colonies. Consequently I’ve switched to the alternate half treatment, or one strip per colony of the same size. This treatment is somewhat less effective, probably eliminating somewhere between 50 to 60% of the mites on the adult bees. To offset the reduced efficacy I repeat the treatment every three or four weeks depending on the existing mite load.
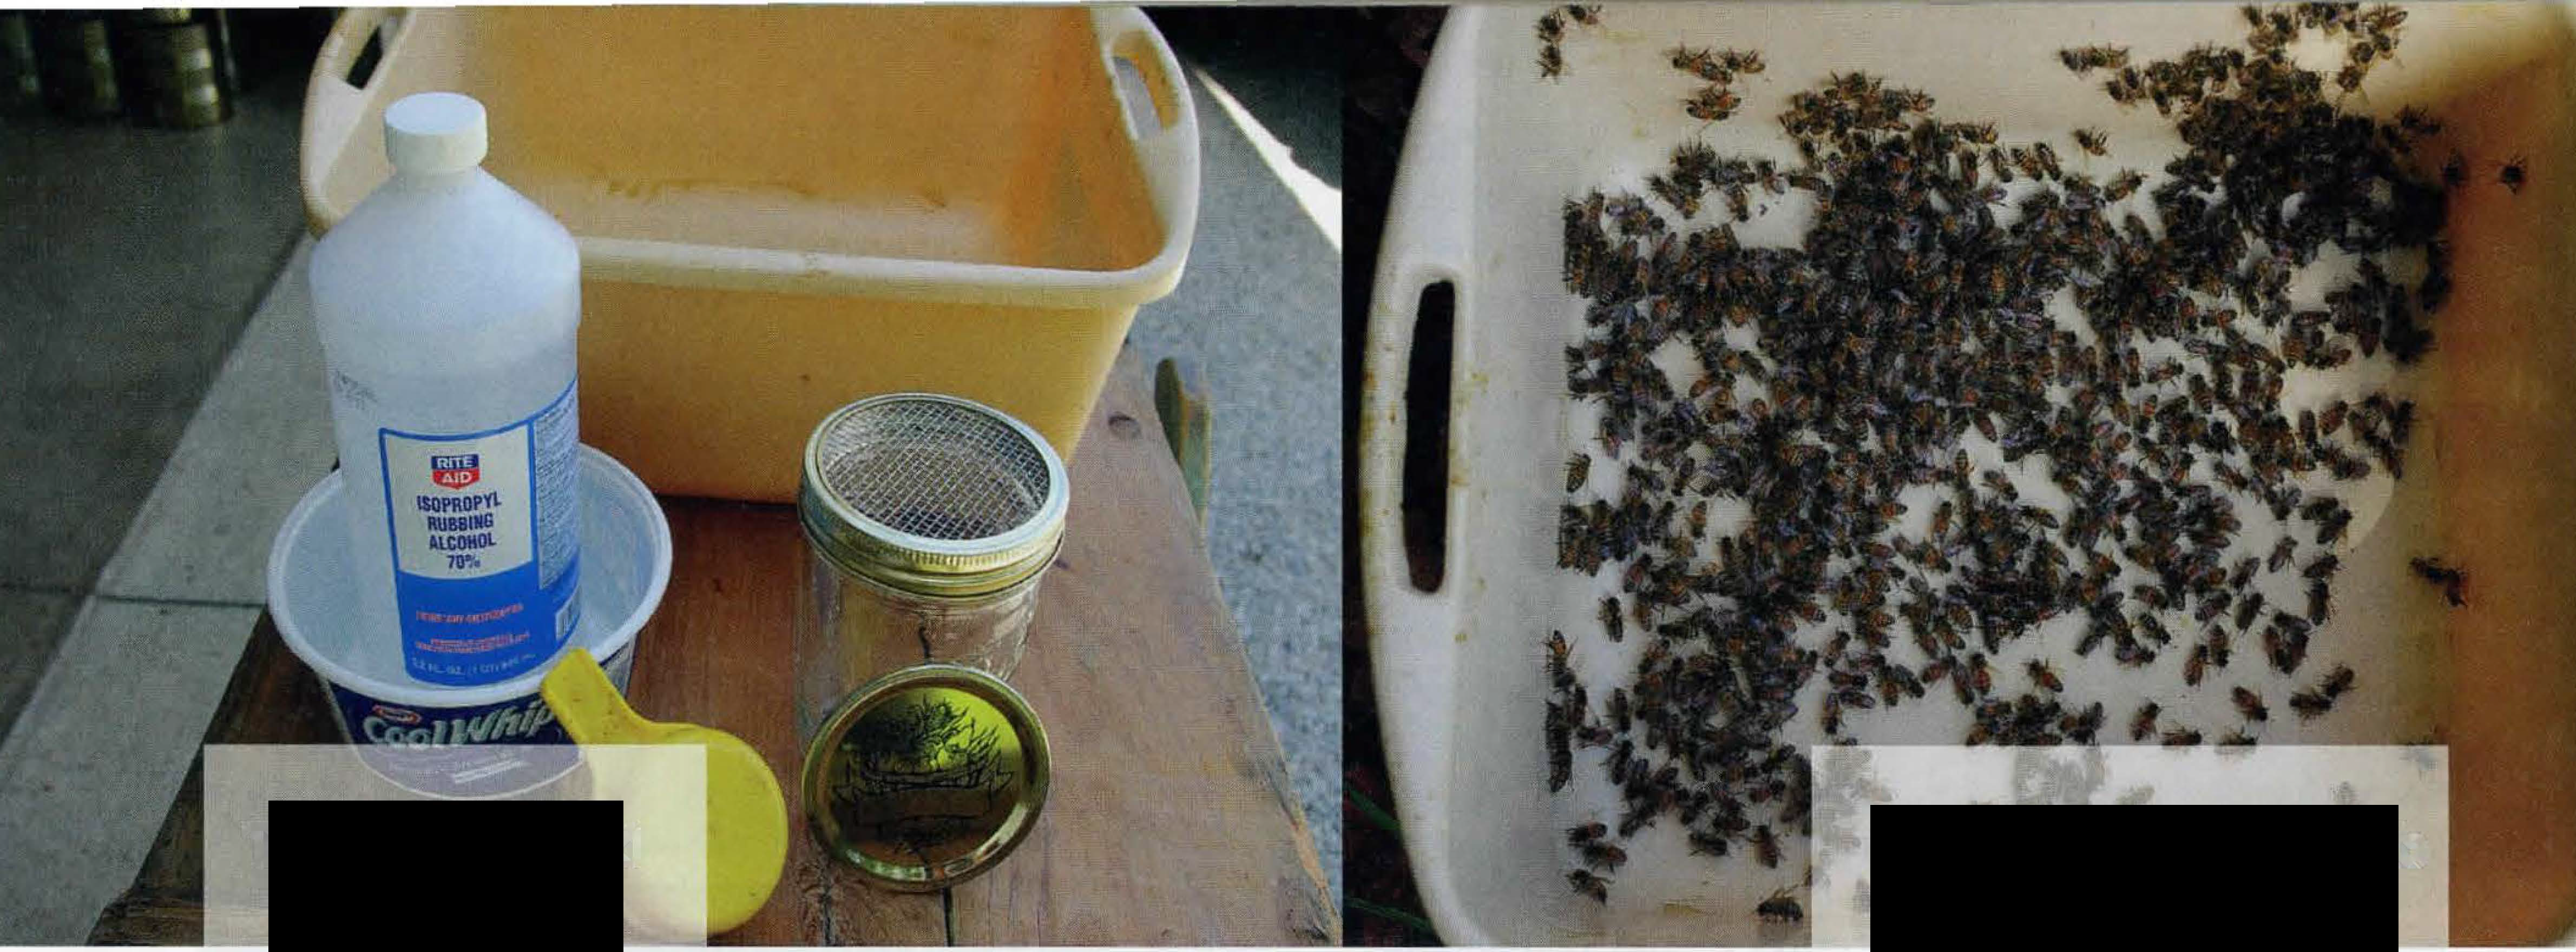
Left: Tools needed Right: Shaken bees in tub
This is the only mite control product that can be applied when there are honey supers on the colony, or in other words, during the honey flow. It is also the only product currently on the market that kills mites under the brood cappings. For that reason this is the go-to product when you encounter a colony(s) with an out of control mite load. The full strength treatment should eliminate the heavy mite load in relatively short order. Hopefully this will allow the colony(s) time to rebuild prior to winter shutdown. Regardless of treatment size or specific usage, carefully follow label instructions for handling and temperature tolerances.
Apiguard is a thymol gel that kills by drying out the mite’s body orifices. Apiguard is marketed in a 50 gram peel off tray for the smaller operator with a few colonies, or in a 6.6 lb bucket for larger operations. The recommended dosage is 50 grams per colony, repeated at two or three week intervals. As with MAQS the full strength dosage can cause some brood loss under certain conditions. However, a 25 gram half dose appears to be nearly as effective, and with minimal brood loss. Treatment application can be achieved a couple of different ways. For those with only a few colonies simply divide the contents of a 50 gram peel-off tray in half. Use a hive tool or small spatula to remove and place each portion on a 2 ¼ inch square piece of waxed paper (dry wax paper works best). Don’t spread the gel, leave it in a clump and center the treatment on the top bars between brood boxes. If you’re treating a nuc or a single hive body colony, use a spacer or deep rimmed inner cover to provide the necessary accommodation space. For multiple colony treatment remove a 25 gram dose from the bucket, (weigh or estimate the volume) and apply in the manner described above. I prefer this product for nucs and small colonies not quite strong enough to tolerate MAQS. I also use Apiguard as a rotational alternative to MAQS, especially during mid-Summer after the supers have been removed.
When is Treatment Most Effective
One of the great Varroa fallacies is the general implication that colonies contain only a few mites in the early Spring. Virtually all of the Varroa buildup projections I’ve ever read started with that assumption. I used a similar example to illustrate Varroa’s reproductive potential earlier in this article. Reality is somewhat different. For example, I sampled a fairly strong colony in my home yard on April 16th of this year. I used a 150 bee alcohol wash and collected 14 mites. Using a little simple math, that translates into roughly 9 mites per hundred bees! That’s a horrendous mite load for this time of year. If left unchecked that colony will begin to fail before the end of the main honey flow! By early August the mite infestation along with the associated viral infection will have doomed that colony. A quick check of last years records indicated the home yard had been periodically treated with either formic strips or Apiguard. The last treatment with formic strips occurred on September 10th (This is about the latest I can treat with MAQS or Apiguard and still remain within the temperature thresholds) Obviously my bees reacquired a mite load by robbing out nearby collapsing colonies during the unusual warm weather we experienced in October and early November.
When you couple an existing mite load with the massive amount of brood rearing that occurs during the Spring buildup period, (creating the ideal mite reproductive environment) it should be obvious that you initiate your mite control program as soon as weather permits. In other words, once the weather warms enough to work bees, it’s warm enough to begin sampling. DO NOT ALLOW VARROA TO GAIN THE UPPER HAND. The idea is to keep the mite counts low, thereby preventing the viruses from gaining a foothold and eventually destroying the colony.

Tap to corner
For larger apiaries, sample several colonies. This should give you an overall yard perspective. Mite loads can vary significantly between colonies for a variety of reasons. If you encounter one or more colonies with a high mite load, assume the remaining colonies contain (or soon will) a similar number of mites. (Both workers and drones drift freely between colonies within an apiary) Failure to treat all the colonies in the yard will allow drifting bees from non-treated colonies to quickly re-infest the treated colonies. Mite loads can vary significantly from one location to another. View each yard as an individual entity, periodically sample and apply treatments accordingly.
Small operators have a huge mite control advantage (the absence of drifting between colonies) due to the limited size of their apiary. These folks only have to worry about mite reproduction within an individual colony or two. Periodic sampling, along with timely treatment, should provide a relatively mite free environment throughout the active season.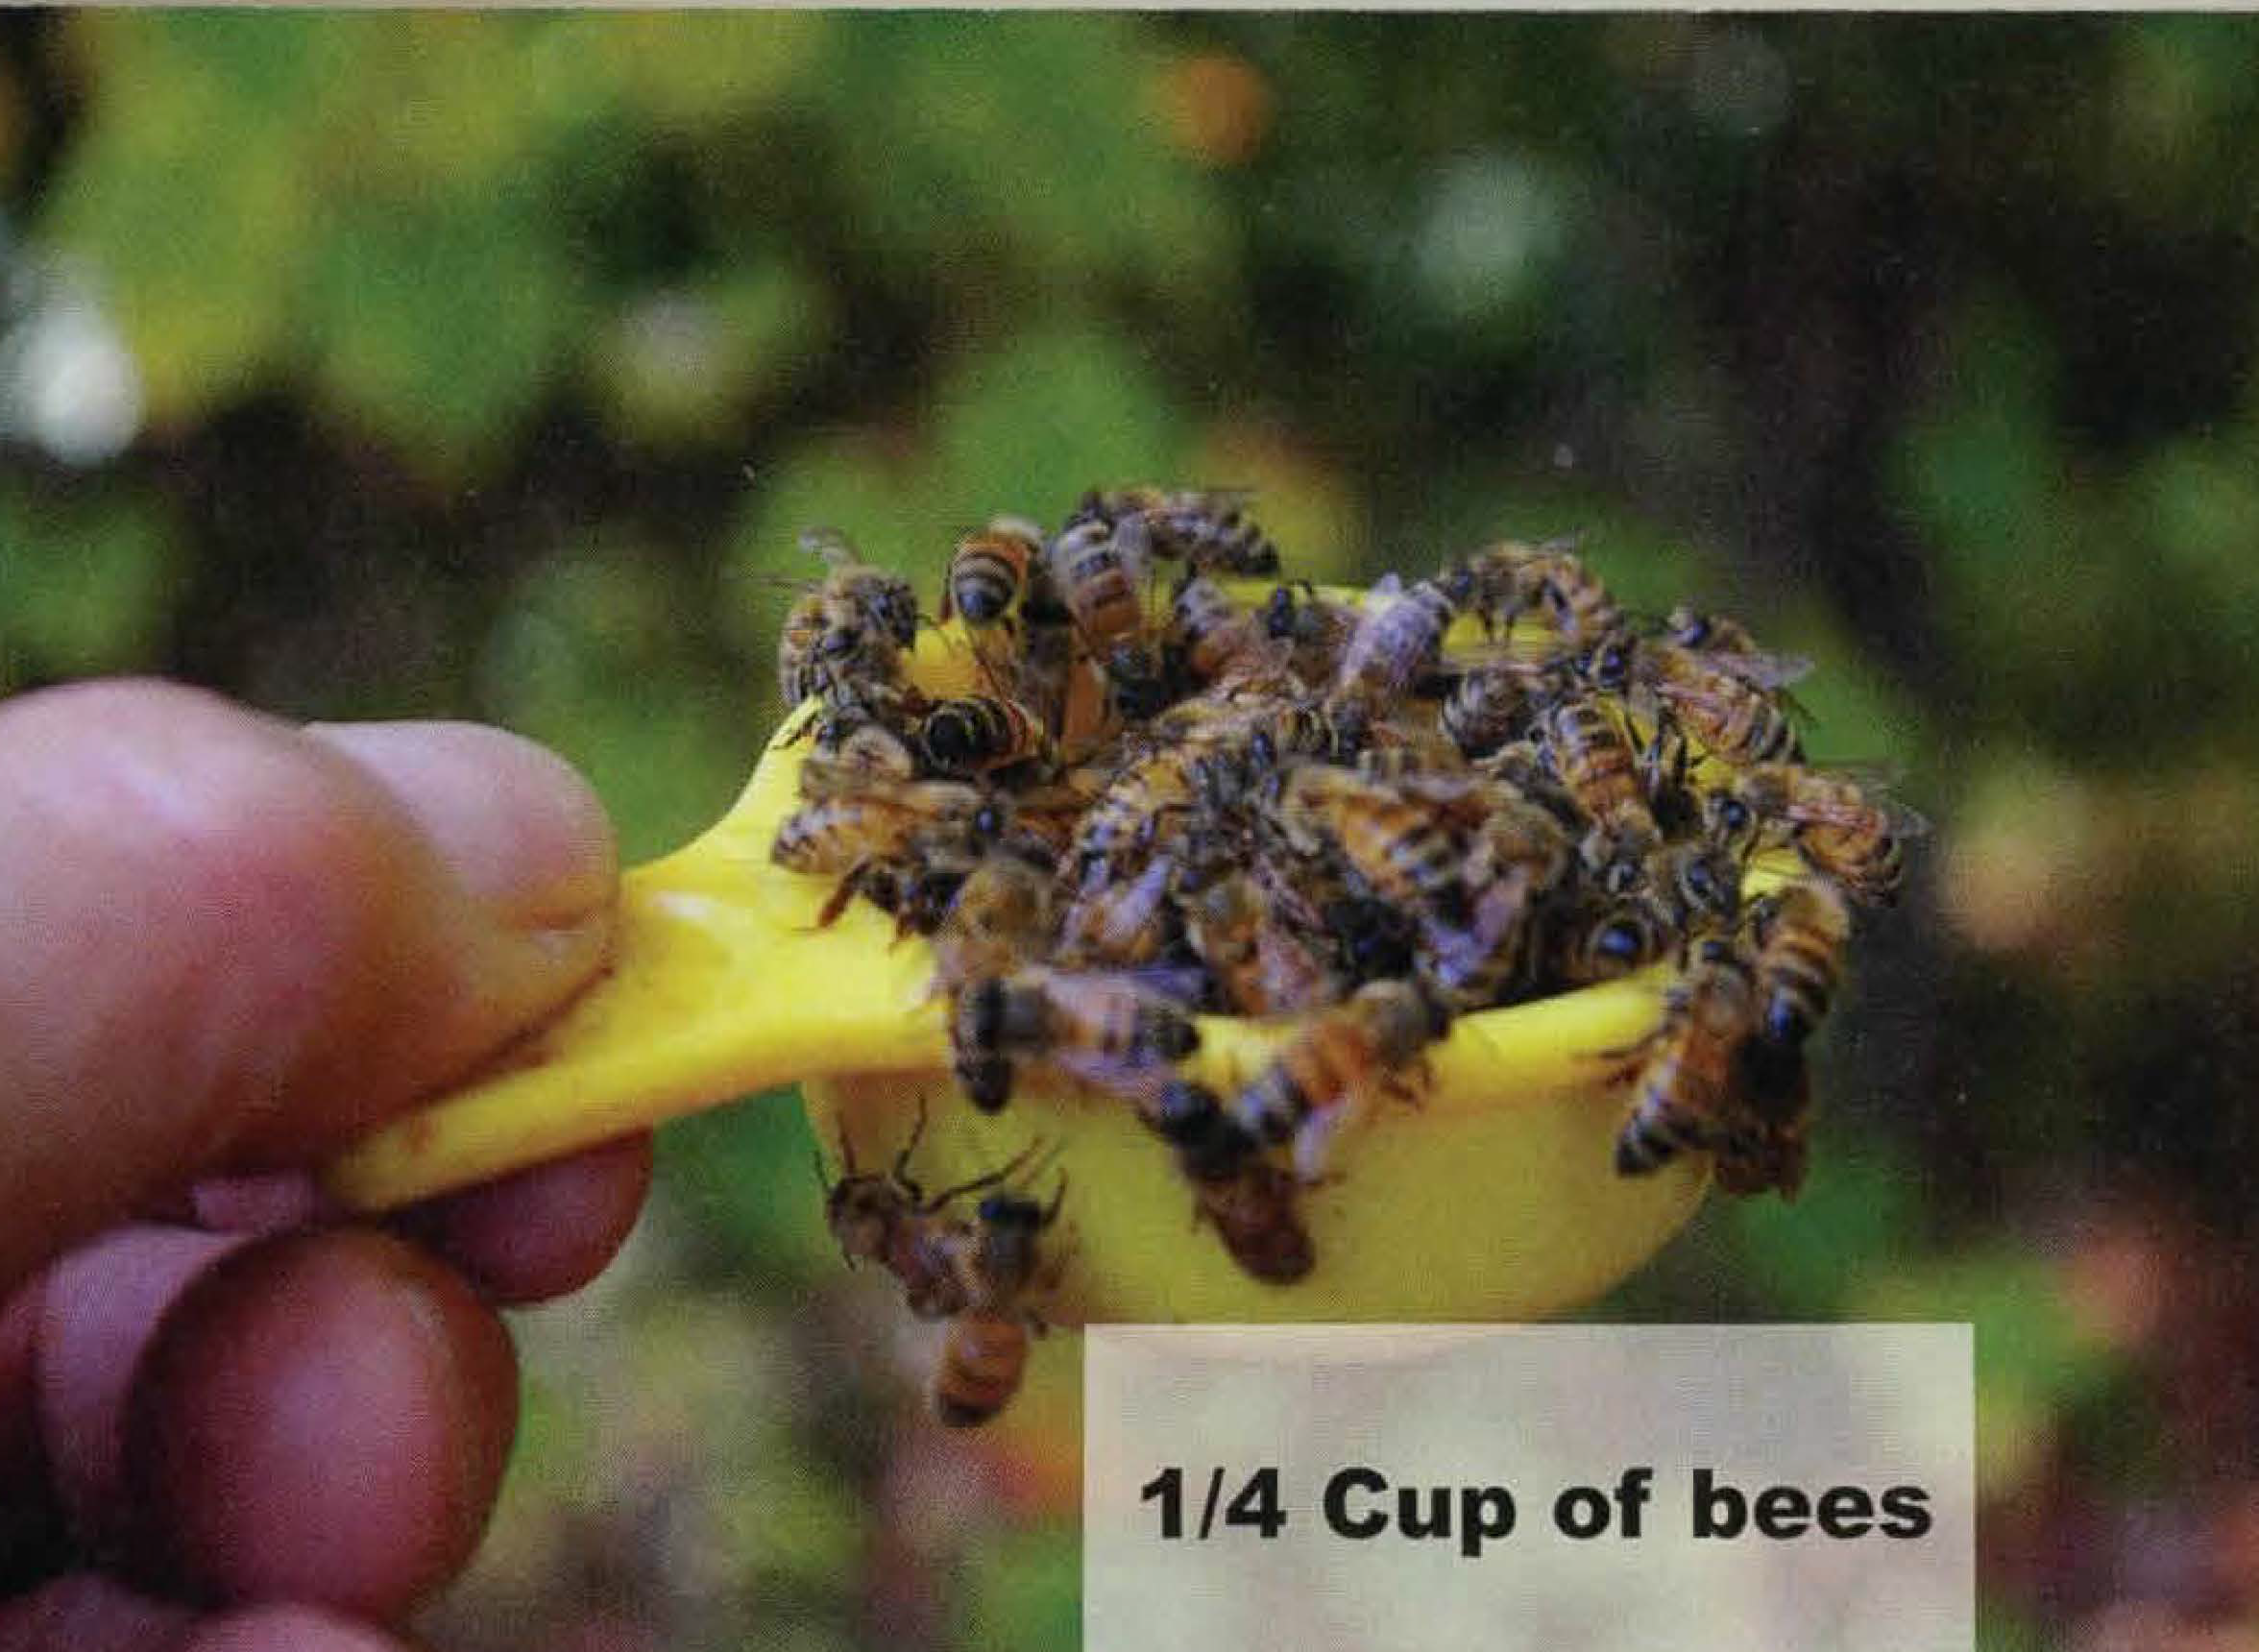
The post-honey flow period is the next time frame of concern. While MAQS can be applied just prior to, or during the honey flow, most beekeepers wait until crop removal to rejoin the mite battle. The primary danger now lies with mite transfer from nearby collapsing colonies, both managed and feral. Since prevention is not possible, it’s imperative that you periodically sample to determine the extent of any unanticipated mite buildup, and treat accordingly. A second option is to treat on a periodic basis throughout the remainder of the season to prevent or eliminate any abnormal mite influx.
August and Beyond
Locally we generally enter a nectar dearth period starting around the tenth of July, give or take a few days. By the first of August pickings have become few and far between. This marks the beginning of the robbing season. Now the main mite worry comes not from within, but from nearby untreated colonies. This is one of the great negatives of the massive influx of new beekeepers over the past decade or so. Many of these folks either don’t know about Varroa and the necessity of control, or they have been lead to believe that treatment isn’t necessary, “The bees can take care of themselves”. Either way, you lose. Your bees eventually end up taking advantage of the free lunch, (robbing out their collapsing colonies) and in the process they bring your neighbors mites back home to your colonies. This mite transfer continues throughout the late Summer and Fall, whenever the lack of incoming nectar promotes a robbing opportunity. To add insult to injury, for the past couple of years we have experienced above normal temperatures throughout October and the first half of November. This unusual warmth has extended the late season flight time, during a period of total nectar dearth, and has dramatically increased the prospect of mite transfer from nearby collapsing colonies. That is no doubt one of the reasons I’m seeing such high mite counts in early Spring.
Dump in alcohol
Treatment Recommendations
Successful mite control is best achieved by keeping the mite counts below the damage threshold throughout the active season. I can’t stress enough the importance of starting your mite control program as early as possible. It’s imperative that you prevent the mite associated viruses from becoming established and causing further, perhaps irreparable long term colony damage. Full strength treatment with either MAQS or Apiguard during the Spring buildup period can cause brood loss beyond acceptable limits. As a consequence I recommend using the weaker dosages at two or three week intervals should your early season mite counts trend above acceptable limits. Later in the season after the honey crop has been removed I would not hesitate to use the full strength (two strips) formic treatment to knock back an out of control mite load!
Strain out mites
(Remember, a full strength MAQS treatment kills 93-95% of the mites under the brood cappings.)
My goal is to keep the average mite level as low as possible. While I strive to keep the adult bee mite count at 2 mites per hundred bees or less, that’s not always possible in my erratic environment. But, I try! A quick check of my colony records for the past two years indicated that I treated my four yards an average of three to four times per year. The smaller yards that contained early or mid season splits had the lowest number of treatments. The larger production yards, with the strongest colonies required more treatment. All the treatments over that two year period were of the half-strength variety, either one formic strip or 25 grams of Apiguard. On average treatment was applied in mid May, mid to late July, the last half of August, and as late in September as weather would allow. The September treatment was intended to help offset any late season mite transfer due to the collapse of nearby untreated colonies.

Left: Flash MAQS treatment Right: Full strength MAQS treatment
Some will wonder why I don’t use oxalic acid as a late season mite control agent. Good question. Because of my prolonged overwinter-early Spring confinement period, (7 months on average) I try to avoid opening colonies any later than the mid-September. The prospect of applying an oxalic acid dribble during late October or November is in my opinion, not worth the risk of incurring an alternative injury, such as killing the queen. And I have absolutely no interest whatsoever in fooling around with oxalic acid sublimation, period.