By The Ontario Bee Journal; Appeared in the Spring 2020 issue of BEEKeeping Your First Three Years
Splitting existing colonies is a great way to increase colony numbers without having to buy nucs. Here is a quick and easy guide to a simple split.
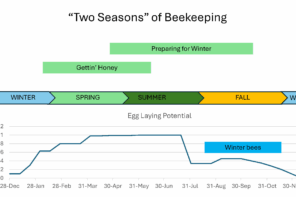
1. TIME SPLITS ACCORDING TO WHEN QUEEN ORDERS WILL BE READY. A new queen (or queen cell) is needed for the secondary colony being created, and typically newly mated queens are available in June in Ontario, so this a good time to consider making splits. Swarming may occur before this time, so removing swarm cells on a weekly basis will keep the colony strong and intact.
2. CHOOSE A STRONG COLONY TO SPLIT. This source colony should have plenty of bees, brood, and honey. A mediocre or weak colony will lessen the survival chances of the source colony as well as the new split(s). A diseased colony should never be split. Monitoring a colony for mites and diseases before splitting will prevent their spread.
3. MAKE SURE THE QUEEN IN THE SOURCE COLONY IS YOUNG AND PRODUCTIVE OR REPLACE HER AT THIS TIME. The queen of the source colony should be found before splitting. Placing the queen in a cage will keep her safe while the frames are being handled.
4. DO NOT TRY TO MAKE TOO MANY SPLITS FROM A SOURCE COLONY. A very strong colony can yield more than one split but splits are more likely co survive if they are well stocked with bees, brood, and honey. Nuc boxes can be used to temporarily hold a split until it is strong enough to be moved into standard equipment.
5. GIVE BROOD TO THE NEW SPLIT. Use at least one frame of emerging brood to ensure enough nurse bees to care for the brood along with three or more frames of brood of differing ages, covered with bees. The brood frames often contain enough pollen for additional brood rearing. One additional frame of honey should also be used.
6. REMOVE ANY WILD QUEEN CELLS WHILE CHOOSING FRAMES FOR THE SPLIT. Any wild cells will hatch and fight with the new queen or will destroy the queen cell provided. Place all frames containing open or capped brood in the middle of the hive body. This makes it easier for the bees to regulate the temperature of the brood nest and to care for the larvae. Honey (and pollen) frames should be placed surrounding the brood frames. Arrange the remaining frames in the source colony the same way.
7. SHAKE BEES INTO THE SPLIT TO ENSURE A GOOD POPULATION. Keep in mind that bees tend to return to their original hive. To prevent this, the entrance of the split(s) can be temporarily blocked with grass, screened or can be moved to a different yard. Bees and brood from different colonies can be combined into one split, since it will receive a new queen or a queen cell.
8. PROVIDE ONE QUEEN PER HIVE. The queen from the source colony can be placed back into the original hive. Introduce a mated queen or a queen cell into the new split(s). Splits chat receive a mated queen can be a little weaker than if a queen cell is used because production of new bees will begin sooner with a mated queen than with a cell.
9. FEED THE NEWLY CREATED SPLIT(S). It doesn’t hurt to provide supplementary sugar syrup ( 1:1 sugar to water by weight) and a protein supplement (see the “Homemade” recipe on the website) until they are strong enough to forage for themselves. If the split is in full sized equipment, insert an entrance reducer to help minimize heat loss.
10. DO NOT DISTURB. Leave the split(s) alone during the initial window of queen introduction. If the colony is opened or disturbed while accepting a new queen or queen cell, it may reject what was provided and the split will not be successful.
11. CHECK ACCEPTANCE. If a mated queen was introduced, check back in 8-10 days to see if she is laying eggs. If a queen cell was introduced, check back for eggs in 14-16 days.
And that’s it. Good luck!